This is part of the CEP Mega Guide series. See also: sample CEP extension source
Now that the previous articles have covered everything I know about developing and testing HTML5/Node.js extensions to Adobe tools, all that remains is packaging and distribution (and then ruling the world, and so forth).
Overview
- Extensions must be packaged into a simple format to be installed. This can be done with a command-line tool, or automatically with Extension Builder 3.
- Packaged extensions must be signed with a certificate, but a self-signed certificate is fine in most cases.
- The recommended way of distributing extensions is Adobe’s “Add-ons” repository. Distributing them directly works fine too, but is a bit less convenient for the end user.
Packaging
Adobe tool extensions are packaged as “ZXP” files. Technically speaking a ZXP is just a zip of your extension’s source folder, with added signing details and the file extension changed to “zxp”.
Packaging from the command line
To package an extension folder, you can grab the “CC Extensions Signing Toolkit” command line tool from the Adobe Labs Extension Builder 3 download page (near the bottom). Invoking this tool is pretty straightforward:
# create a self-signed certificate |
# sign and package the extension |
For further details check the CEP documentation, p28. Incidentally right now there’s a gotcha - the command line tool currently doesn’t overwrite the output file if it already exists, so for a build script you’ll want to remove the output files before packaging. Here’s the script I use to package my extensions:
|
Of course you’d need to tweak that to run it on Windows from powershell, but the signing toolkit parts would be the same.
Packaging with Extension Builder 3
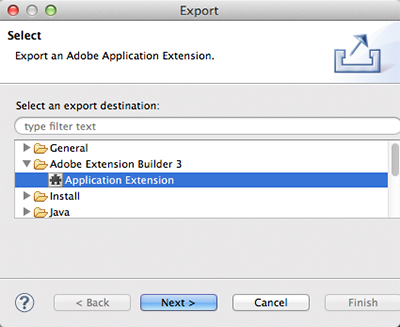
If you use EB3 (explained in part 2 of this series), packaging and certificate creation can be done automagically (though it’s using the same tool behind the scenes). To do this, right-click your extension project in Eclipse, and select Export > Adobe Extension Builder 3 > Application Extension > Next.. to get started.
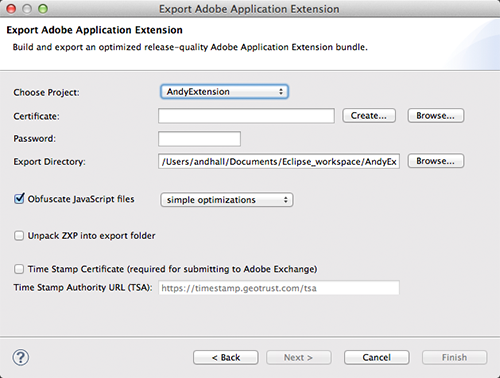
In the next dialog you set all the packaging details:
Note that you can also click the “Create…” button to create a self-signed certificate if necessary. EB3 can also do some simple obfuscation of your JS files. (Behind the scenes this feature uses Google’s closure compiler).
Installing a ZXP
Once you have a ZXP file packaged, you can install it directly with Extension Manager CC, which can be installed via the CC desktop app (like any other CC tool). If Extension Manager is installed, double-clicking a ZXP file will invoke it and start the install process. (Note that handling HTML extensions requires the newest version of EM.)
Of course this works for others as well, so one way to distribute extensions is to just make the ZXP available, and tell people to double-click it. There are two drawbacks to doing this:
- Users typically don’t have (or need) Extension Manager installed
- If the extension’s signature isn’t trusted (which will generally be the case if you used a self-signed cert), Extension Manager will show a reasonably scary “Do you really want to install this?” message during installation (as well it should).
If your extension is intended just for your team or your company, these points probably aren’t a big deal, and just distributing the ZXP should work fine. For widespread distribution though, the better option is:
Distributing via Adobe’s “Add-ons” site
As part of the Creative Cloud service, Adobe operates an extension repository called Adobe Add-ons. Extensions can be browsed, installed, and managed entirely from the browser, so for the user there are no extra steps. (Actual installation of files is done behind the scenes by creative cloud’s file syncing.) And since free extensions can be self-signed, there no costs anywhere for getting started. (The repository also supports paid and subscription models, but you’ll need a purchased CA cert for those.)
Be aware, though, that Adobe Add-ons is a curated market (similar to most app stores). Each extension is reviewed (by a person!), and must meet various approval guidelines before becoming available to users. The service’s FAQ says approval will take 1~4 days; in my case my extension was approved the day after I submitted it.
To get started with distributing extensions from Adobe Add-ons, log into the producer portal with your usual Adobe ID, click the “New Product” button, and follow the steps from there. If you select the “Private” option the extension will only be visible to people you specify, so this is probably a good idea at first, until you’re familiar with the system - then you can submit a new product that will become the public version of your extension.
And there we have it - the super mega guide to HTML5+Node extensions, in seven easy parts. May it serve you well! As always, leave a comment if anything’s unclear and drop me a line if you make anything awesome.