This is part of the CEP Mega Guide series. See also: sample CEP extension source
Overview
Node.js is a development platform built on Chrome’s Javascript engine. If you haven’t tried it yet (and I’m talking to my twin brother here), go get it, it’s awesome. Each Adobe tool that supports HTML panels has a built-in instance of Node that panels can interact with. Since Node has powerful core APIs and a massive ecosystem of 3rd party packages, it’s tremendously useful for extensions.
Calling Node’s core libraries
Rather magically, Node runs in the same VM as Javascript in your HTML panel. No setup is needed to call core libraries - just require ‘em and use ‘em.
<button onclick="readfs()">List files</button> |
Adding third-party libraries (manually)
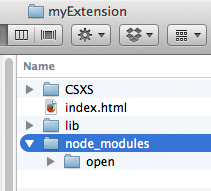
Calling external Node libraries works exactly the same as with built-in APIs (above), so all you need to do is add them to your project. To do this manually, just add the library to a folder called node_modules in your extension source. For example, to open URLs in the system’s default browser, you could get the open module from npm, and place it thus:

Then you can require it, thus:
<button onclick="openhtml()">Visit Adobe</button> |
Adding third-party libraries (with npm)
Assuming you have Node.js installed, it’s perhaps easier to add packages with its package manager, npm (which gets installed along with Node). To do so, make a node_modules folder and then call npm install somePackage from inside it:

For extensive Node use you could also create a package.json for your project, declare some packages, and manage them by calling npm install and npm update and so forth. The details of all this are the same as for any Node app, so I won’t go into it here except to say that CEP 5 doesn’t know or care about package.json files - it only looks at the XML manifest.
Sample code
Both code samples above can be seen in context in my sample CEP extension. For a more real-world example of an extension using Node.js, I suggest this RSS reader panel from the CEP samples repository.
Notes and caveats!
Regarding iframes: If your HTML panel ever shows external (and possibly untrusted) content in an iframe, CEP includes a way to disable Node.js from being used in that frame:
<iframe nodejs-disabled="true" id=".." ... > |
Using that setting for any and all iframes would probably be a good idea.
Unsupported APIs: Node’s Cluster API won’t work in CEP panels, and the Console API works on Mac, but not Windows. Everything else should just work.
Global scope and conflicts: The CEP framework does some tricky stuff behind the scenes to make Node available to Javascript running in the HTML page. As a result of this, several objects get injected into the page’s DOM. They are global, GLOBAL, root, window, Buffer, process, require, and module.
If you want to use any libraries or frameworks that rely on global vars with any of those names, you may have to finagle things a little. The most likely case is using a library that loads in an external require module. Doing that would overwrite CEP’s require command, leaving you unable to use Node.js libraries, unless you keep a reference to CEP’s version of the require method:
<script> |
Persistence: Node runs in the same process as the CEP panel, so code you run in the Node instance will persist, or not persist, along with the HTML panel content. Panel persistence generally is covered in Part 3 of this guide.
And that wraps things up for Node.js integration.
Next up is the big one - Part 5: Tool integration!